Showing posts with label Paper Crafts. Show all posts

Dec 6, 2013

Christmas Classics : Treat Boxes

Some things never lose their charm! Down here at the shop, we have several designs that our customers have come to expect year after year. You could say they have become a Pebbles tradition. Treat boxes are one of these and today I am highlighting 2 Christmas favorites!
Our Holly Pillow Box makes a perfect party favor, place setting or special gift...just add your favorite treat. It's Christmas "specialness" all tied up!
A cheerful way to say Ho Ho Ho and Merry Christmas to family and friends, our Santa Treat Box works well as a place setting or party favor too. Don't you love his little face?

Both kits come with enough supplies to make a set of 6. And assembly time? Only 30 minutes (another Pebbles tradition)! I hope that your holiday plans are well under way and that you are finding time to enjoy this Christmas season. We finally had a big snow fall here, and I can't wait to get outside and play!

Holly Pillow Box  |  KIT    Pre-made
Santa Treat Box  |  KIT    Pre-made

Nov 26, 2013

Last Minute Thanksgiving Decorations

Are you ready for Thanksgiving? Can you believe it is this week? If you need a few last minute decorations, be sure to visit our website here!
 Garlands & Banners  |  Acorn    Fall Leaf    Thankful    Memory
 Pillow Boxes  |  Fall Leaf    Krafty Owl    Dictionary Print Owl
 Pockets  |  Utensil    Treats
 Tags & Place Cards  |  Fall Photo    Pumpkin Tags    Scalloped Pumpkin
Treat Boxes  |  Pilgrims and Indian    Turkey    Owl    Dictionary Owl

Happy Thanksgiving!

Nov 22, 2013

Save The Date : Festival Of Trees

One of the Utah' great Christmas traditions is almost here! The Festival Of Trees is set to open on December 4th, and run through the 7th. If you never have been, you should look into going. This Festival is a huge Christmas fundraiser, where 100% of the proceeds are donated to Primary Children's Hospital for children in need. At the festival, homemade Christmas trees, holiday articles, candies and baked goods, wreaths and door decorations, centerpieces, gingerbread houses and backyard houses are for sale.  If you want to learn more, click here. It is truly inspiring!
Today, I am featuring one of my latest creations! My Christmas Tree Ornaments have a simple, classic design. Made from solid cardstock, they are perfect for small hands to decorate with craft supplies from home and will create a keepsake that will be treasured through the years (think grandparents or far away loved ones).

Christmas Tree Ornament  |  KIT only

I am so excited for Christmas!

Oct 29, 2013

Silhouette Shapes On Sale Now!

That's right! Now through October 31st, save 25% on all of Silhouette's Halloween shapes. It's not too late to put something extra special together! Here are just a few of our Halloween designs on Silhouette now ready for download. See them all here.
If you have yet to discover Silhouette, I strongly encourage you to check it out. It is such an easy way to make scrapbook pages, cards, custom apparel, vinyl decor, etched glass, sketch designs, temporary tattoos, paper crafts...the creative possibilities are endless. To learn more, click here.
Happy creating!

Oct 25, 2013

Beautiful Fall Leaf Garland : Paper Crafts

I am so excited to share the latest garland we've made! If you enjoy fall as much as I do, you will love this beautiful fall leaf garland. I was inspired to create it after watching the maple trees near my home turn colors. At their height, some of them literally seem to glow. It's mesmerizing!
This garland is made up of 105, 3.5" paper leaves. Total, there are 7 different assorted fall colors in each kit. All leaves are made from premium textured cardstock. I especially like how long it is...30 feet! You'll have plenty of length to hang it up just about anywhere. I think the crinkled leaves give it an authentic fall look. Its' simple assembly makes it an easy fall project (should take you no more than 20 minutes). I love how it came together and hope you do too!
Fall Leaf Garland  |  KIT     Pre-made

SHOP ALL OF OUR FALL DIY KITS AT OUR PEBBLES IN MY POCKET SHOP

Sep 20, 2013

DIY : Spider Garland


Wouldn't you like to have some of these guys hanging around for Halloween?  Our Spider Garland is way too cute to be scary and will add a nice whimsical touch to your Halloween decoration. Surprisingly, they are very easy to make! Simply sew a straight line (we recommend using black thread), making sure to keep the stitching between each spider to approximately 1".  It is always helpful to practice first on a piece of scratch paper to check your sewing machine's tension.

Keep in mind: stitching will not always be perfect and the spiders will not always be evenly spaced...but this just adds to its' charm!  I think you will have lots of fun with this garland!
Have a great weekend!

Sep 19, 2013

A New Addition : Bat Pillow Box

Presenting our new little addition...Mr. Bat Pillow Box!
Okay.  I admit it.  I just couldn't resist making at least ONE more.  They are so fun to design.  I also wanted to see if I could create another fun Halloween ghoul from this box.   It really inspires me.
This guy makes a great addition to our current spooky collection of Halloween pillow box creations; which include pumpkins, owls and a spider.  As you can see, each is made with a unique paper pattern from our new Thirty One collection.  When placed altogether, they make the perfect coordinating set!
And, the Bat Pillow Box assembly is super easy...just like all of our other pillow boxes.
  • Find easy to assemble kit here
  • Pre-made set found here
  • Download Silhouette pattern here

What Halloween creature would you make from a pillow box?

Sep 17, 2013

Perfect Fall Packaging : Pillow Boxes

Today I am going to share with you some adorable pillow box ideas I've recently created.  If you love fall like I do, then you're going to love these creations for packaging up some treats to enjoy the next you and your family get together.
The pillow box from Pebbles In My Pocket is absolutely perfect for storing just about any individual treat or small gift for your guests.  Once assembled, simply fill the boxes and fold in the ends.

Since I am all about presentation, I am happy to tell you that I have created many different fall-themed pillow boxes for you to choose from.  You can see all of them here.  Below are samples of my newest creations.
Aside from creating memorable family gatherings, how about these fabulous ideas for using my fall pillow boxes:  packaging for party favors, gift packages for teachers (or students), "thank you" gifts for friends and neighbors.


Follow the links below to find these easy to assemble kits:
For Silhouette users, you can download the following patterns from the links below:
I hope you enjoyed the ideas I've shared today!

Sep 16, 2013

Spiders on Paper Straws : DIY


Happy Monday!  I hope you had a great weekend.  I was able to take some time and hike with family up to the beautiful Cecret Lake.  It is always fun to get outdoors and enjoy the fresh air!
I am going to have a busy week getting all my fall creations ready to show-off.  You will be seeing more of these as the month progresses.  I know that it is not "officially" fall yet...but it is getting really close and I want to be prepared!
To start your week off right, I thought I would share this darling Spider on Straw Kit from yours truly! I love little things that add a special touch.  And it's ready to go in minutes.  Enjoy!


Sep 12, 2013

DIY : Spooky Spider Treat Cup

Let's face it.  No matter how much we complain (as mothers), the holidays are all about treats. We like to pretend otherwise...but the kids know and I've just given in. Why fight a losing battle?  Here is one of my latest "treat" holders.  The Spooky Spider Treat Cup.
Cute, isn't he?  I like his whimsical personality.  It's sort of amusing.  Anyway, he comes in a kit of 12 and the assembly for the whole thing is about 20 minutes.

  • Easy to assemble kit found here
  • Download pattern from Silhouette here
  • Additional Candy Cups found here

Sep 9, 2013

DIY : Halloween Treat Boxes


So, what comes to your mind when I say "little kid Halloween party"?  Something scary?


Introducing Spidey, Frankie, Batty, Ghosty and Pumpkn'!  Your friendly (and somewhat mischievous) neighborhood gang of ghouls.  Perfect little haunts for a child's Halloween party.
All of these guys are made from the same basic 3 steps: fold, glue, attach unique parts.
Easily only a 30 minute project total.  Love it!

  • Easy to assemble kit found here
  • Save time and let us do the work for you here
  • Crafting supplies for this kit can be found here
  • Download Spider pattern on Silhouette here
  • Download Frankenstein pattern on Silhouette here
  • Download Bat pattern on Silhouette here
  • Download Ghost pattern on Silhouette here
  • Download Pumpkin pattern on Silhouette here

Sep 4, 2013

Front Porch : More Creations

I am thrilled whenever I am able to take a break from all these holiday preparations, just sit down and create something beautiful.  I took a moment last week to do just that with our new Front Porch collection.  As you know, it is in stock now.  You can view the whole collection of it here on our site.
For these creations, I used the following:

  • Mason Jar - Welcome and Knock Knock papers
  • Flowers Bouquet - various with Book Club as flower center
  • Thank You Card - Knock Knock paper combined with Library Pockets & Tags
I especially love the versatility of this collection!  Many of its' elements could easily be used on scrapbook pages as well.  For more collection information and ideas, take a look at my blog post here.

Sep 2, 2013

Happy Labor Day...Hello Fall


Happy Labor Day!  It is now the "official" start of fall.  Don't you love this time of year?  Leaves turning colors, kids heading back to school, the smell in the air...fall is slowly creeping up on us and my creations are reflecting this.  For example, these cute little pumpkin ornaments!

True to our Pebbles style, these are incredibly easy and fun to make.  Simply curl green strip with round object (like a pencil).  Then, place 3 circles on top of each other, lining the scalloped edges up.  Fold the pumpkin stem in half and place on top with the curly stem tucked underneath it as shown.  Then, sew a straight seam down the middle, reinforcing at the beginning and end (begin with extra thread on top for hanging).  Trim bottom thread and tie the top threads into a 1/2" knot for hanging.  These are especially beautiful when hung from a natural or black spray-painted tree branch!  Check the links below for ordering.

  • Easy to assemble kit is found here
  • Save time and let us do the work for you is found here
  • Paper from Thirty Once collection found here
  • Download this pattern on Silhouette here


Aug 30, 2013

From Me to You...Couldn't Wait to Share!

Remember when people would take the time to hand-craft and write a note to a loved one?  I still love it best when someone sends me a little note with a personal touch!  I guess I couldn't help but reminisce a little about "traditional correspondence" as I created with this collection.  It's so...fun! 
As promised, here are just a few of our recent creations made from the From Me to You collection of Pebbles Inc.  Aren't the colors cheery?  Which one do you like best?  You can check out the full collection here.

Aug 29, 2013

Spider Box Tutorial

We have received such great feedback regarding these tutorials.  Thank you!  We will just have to keep posting.  But, we don't mind because they are so much fun to make.  Also, they illustrate perfectly the uncomplicated style of our projects.  Incidentally, for those followers of ours who use Silhouette, you can now download this spider's pattern here.  Enjoy!

Assembly instructions:  Lightly bend spider box body along score lines.  Place a strip of strong stick tape to the box lip and assemble as shown.  Fold in notch-ended side first, then solid-ended side. Assemble leg pieces and googly eyes as shown with white glue.  Fill with your favorite treats!

Just A Little Batty


I don't know about you, but sometimes (just to keep my sanity), I need decor that is "easy up...easy down".  You know what I mean.  Decor that will bring in just the right atmosphere, something whimsical and unique, that I don't have to spend half a day assembling and creating.  I love stuff like that.  Was this thought the genesis for my creation of these clothespins bats?  Who knows.  The idea isn't new...but it's definitely the paper that gives them their charm.
I think these little guys could be hung just about anywhere: a homemade Halloween tree, indoor plants, lamp shades, mantel pieces, in the hair of a random grandchild (never mind).  I think you get the picture.  "Easy up...easy down". Love it!


  • Easy to assemble kit to be found here
  • Save time and let us assemble the kit for you is found here
  • Printed paper from Thirty One Collection found here
  • Download this pattern on Silhouette here
  • Find links to all crafting supplies here

Aug 28, 2013

Spider Pillow Box


Just had to add another one to our little collection.  This spider pillow box is yet another way to complete your Halloween guest table decor.  So far, we've had owls and pumpkins.  Why not a spider? But, he's too cute to be spooky!  I wonder what pillow box creation I will make next? Hmmm...

This little guy could make a great "quick gift" to a friend or relative, or maybe even as an invitation to a party.  What are you using these for?  I will be posting its' easy-to-follow tutorial soon...so stay tuned. Until then, however, check the links out below for all ordering info.


  • Easy to assemble kit is found here
  • Save time and let us assemble the kit for you is found here
  • Printed paper from Thirty One collection by Pebbles Inc found here
  • Adhesives are found here


Aug 27, 2013

Pillow Box Tutorial

These tutorials really give you an idea of how easy our projects are.  Especially this one!
Simply bend along the score lines of the pillow box cut-out, then place a strip of double stick tape to the lip of the box.  Assemble as shown, making sure to fold the notched-ended side in first on both ends. Finally, attach the stem and vine pieces as shown with white glue.  Viola! 
Need order information?  You will find it on my blog post here.  

Aug 26, 2013

Pumpkin Pillow Boxes


I can't enough of these pillow boxes!  Know the best thing about them?  The seemingly endless creations you can make from such a simple shape.  For example, just look at these 3 little pumpkins. Same shape, same size...yet a completely new creation.  Love it!  Love it!  Love it!
Of course, I've kept this little pumpkin project super simple.  Here are your options:  if you need to save some time, you can purchase them here as a pre-made set (all you'll have to do is fill them up with your favorite treat).  If you prefer to assemble them yourself, and save a little money, order here.  Finally, if you own a Silhouette, you can purchase them here.  I will post a tutorial later.
Paper designs brought to you by none other than Pebbles Inc's Thirty One collection (of course).

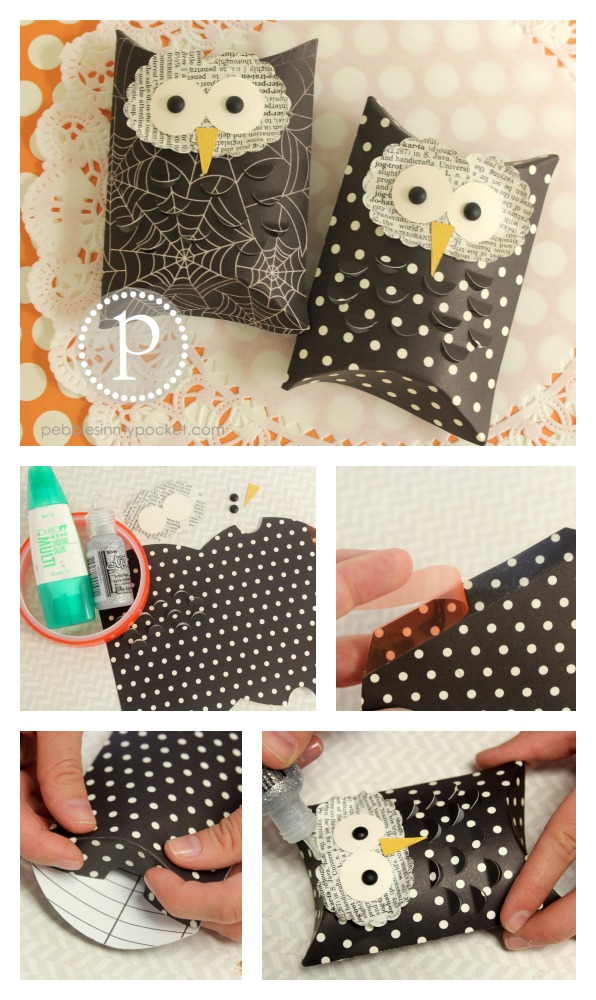
Owl Pillow Box Tutorial

Finally!  Live, in color, and well worth the wait, don't you think?  See how easy this little guy is to assemble?  A simple 6 step, 20 minute project (including drying time ;)).  What I love the most about this owl is the Halloween paper he is made from.  Pebbles Inc's Thirty One collection has so many darling, two-sided choices!
You can either let us do the work for you, and purchase as a pre-made set, or, if you like to do things yourself, you can purchase them as a DIY Kit.  However, for those REALLY creative folks out there, who like to add there own little flair to a project (like me), check out the actual collection choices. Finally, for those with a Silhouette, you can purchase them here as well.
So, here are the 6 simple steps:
1.  Gather supplies (see here for details)
2.  Bend die-cuts along score lines and fluff out feathers
3.  Place a strip of strong double stick tape to the box lip and assemble as shown
4.  Fold in box sides, making sure to fold notched side in first on both ends
5.  Assemble face pieces as shown with white craft glue
6.  Fluff dictionary print outer eyes up
7.  Fill with favorite treats
Okay!  That was 7 steps...but does the last one really count?  Can't wait to share with you our next creation.
”related